chanter
Making a Northumbrian Smallpipe Chanter

(updated 08/02/16)

Preparing the blank
This section has been moved to a dedicated page with pictures of the process.
Go to the blank preparation page


Turning the chanter

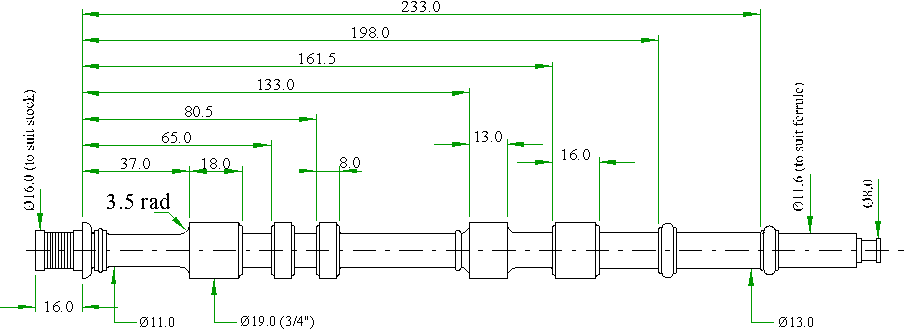
The drilled blank is mounted between centres and turned to a diameter of 19mm (3/4"). It will save time later if you take care to get as good a finish as possible. Mark the ring positions on the blank from the drawings taking care to identify clearly those areas to be turned away.
Turned Blank dimensions

I turn the chanter with a base diameter taper from 13mm diameter at the bottom end to 11mm at the top (see above). This is not just a stylistic device (although I think that it makes a chanter look better balanced) but also allows more room for the larger pad seats of the lower notes and leaves more meat available for undercutting a hole to sharpen a note when tuning (lower notes require more undercutting to achieve the same pitch change as a high note). There is the fact that a thinner wall can give a "brighter sound" to the tone to be weighed against the increased weakness of a thin walled chanter when deciding on the thickness to be used and, if you don't have the facilities to produce the taper, aim at a constant 11mm diameter throughout. I have made chanters as thin as Ø10mm (my first chanter taken from the Cocks and Bryant book) with success.
To turn a taper I use the top slide set over to give a taper of 1mm in 200mm for a 7,11,or 14 keyed chanter or 1mm in 250mm for 16 or 17 key chanters. This is setup using either a dial gauge or a feeler gauge. If you are using a lathe with a headstock bore large enough to pass the chanter blank through, the blank should be gripped in the chuck with only about a third of its length sticking out and the decorative rings, two at the bottom and one at the top machined to shape using form tools. These are plunged in gently until the correct depth is achieved. Next turn the straight sided rings using a parting tool with a blade width of 3mm and its leading and trailing corners rounded off (approx 0.5mm radius).
I turn the rings which have a large radius these take special care as, because of the wide cutting face, they are prone to "chattering". Try to grip the chanter in the chuck as close to the ring being turned as possible. If the work still chatters you may need to use a "travelling steady" to support the part being cut.
Lastly turn the tenon at the top to fit the chanter stock, the tenon at the bottom to fit the bottom cap and the diameter for the bottom tube. The chanter blank should now look like the top view of the drawing.

The reed socket

There are a number of different ways and shapes of reed socket. The traditional version is a taper starting off at about Ø8mm and tapering to the long bore diameter a couple of mm before the top of the "b" hole. My preferred version is a parallel hole of about Ø6.3mm (1/4") finishing at the end of the tennon as shown on the drawings.. I will try to explain the reason for the different styles:- I make the socket using a Ø1/4" counterbore tool that has a central pin which ensures that the socket is concentric with the bore. I hold the counterbore in the chuck of the lathe with only enough sticking out to cut to the depth required. I have a Ø4.2 drill mounted in the tailstock of the lathe. The bottom of the chanter is slid onto the tailstock drill and the tailstock moved towards the chuck until the pin of the counterbore is just entered into the chanter bore. I then start the lathe and with the chanter held, I apply pressure to cause the countersink to cut the socket. I continue cutting until the chanter tenon reaches the chuck jaws.
Machining the Key Mounts
The key mounts can be formed using only a sharp knife and a file but I prefer to machine them on the lathe. I use a vertical slide fitted to the cross-slide of the lathe with a small vice fitted on this to grip the chanter. The machining is done with a milling cutter held in the lathe chuck. My procedure for a standard 7 key chanter is as follows:-
  • Using a 20mm slot drill machine off the top surface flat down to the small diameter. Start with the chanter gripped on the top c#,d# and b/a rings and with the reed socket end of the chanter pointing to the front of the lathe.
  • Set the centreline of the chanter at the centre height of the cutter by using the vertical slide.
  • Machine the rings away taking cuts of about 2mm depth, moving the chanter past the cutter with the cross slide.
  • When these are completed the chanter will need to be moved along and gripped by the bottom F# and D rings ensuring that the chanter hasn't been inadvertently rotated.
  • It is important to get this face right as it is used as a datum for most of the other machining.
  • The chanter should now have a flat on all of the key mounts forming a flat face. I will refer to this face as the datum face
  • Rotate the chanter through 180° so that the datum face is at the back, and machine off the underside of the c# mount and the b/a mount.
  • Rotate the chanter through 90° so that the datum face is at the bottom and machine off the side of the d# mount.
  • Turn the chanter so that the reed end is at the back and the datum is at the bottom machine off the side of the d# key and the back of the c# key.
  • With the datum at the bottom and the reed end at the back machine of half of the bottom E key guide block.
  • Rotate the chanter through 90° and with the datum at the back, machine off the underside of the D mount.


  • Drilling the finger holes
    > I always complete the drilling of the finger holes before starting the keyed holes as all of the holes, with the exception of the back 'g' hole, can be machined with one setting of the chanter in the vice.
    The chanter is gripped in the vice with the datum face at the front and the vertical slide is adjusted so that the centre of the chanter is at the centre height of the lathe. A template with all the hole positions scribed is held along the front of the chanter and located by the chanter shoulder. A steel pointer is held in the chuck and the position of the hole is adjusted by moving the cross slide until the pointer is lined up with the correct scribed line on the template. The pointer is then replaced with a centre drill or twist drill of appropriate size and the hole drilled first with the centre drill then with the twist drill. The chanter moved towards the headstock using the saddle of the lathe until the drill reaches the centre of the bore in the chanter. This can be checked by placing a light at the far end of the chanter and looking through the chanter bore until the drill is seen to emerge. I think it is important for achieving a good tone not to allow the drill to dimple the far side of the bore by drilling too deep. The holes from the b below middle c downwards are drilled Ø4.3mm and from middle c upwards Ø4.0mm.

    Cutting the keypad seats
    Once the finger holes have been completed the holes, pad seats, and key fitting slots can be machined. I always machine these in the same order. First drill the hole in the correct position then exchange the drill for a seat cutter and machine the pad seat as detailed below. These are both completed without moving the cross slide thus ensuring that the pad seat is central on the hole. Once the hole and seat have been completed, I replace the seat cutter with the appropriate slot drill (Ø2.5 for a single key or Ø5.0 for a double key) and machine the slot using the cross slide to move the chanter across the bed of the lathe and the saddle to put on the cut.

    Ø8mm & Ø9.5mm Modified slot drills

    The cutting edges are ground to between 8° & 10° from the horizontal as shown. The double thickness of masking tape is positioned under one jaw of the chuck to slightly increase the diameter of the cut to clear the head of the key.

    The seats for the keypads are cut using a modified slot drill, as shown above, which replaces the drill after a keyed hole has been drilled and before the position of the chanter is changed. The seat is cut by advancing the chanter towards the tool very gently, in the same way as when drilling the holes, until a fully formed seat is achieved. Note some of the drawings show a 15° angle rather than the 10° shown above. This will work but I have measured my cutters and the larger one is 8° and the smaller one is 10°. Care must be taken when advancing the chanter not to allow the cutting to progress too quickly or a damaged seat will result. The cutter for the upper holes is made from an Ø8.0mm slot drill reground as shown above. The cutter for the lower holes is made from a 9.5mm diameter slot drill als reground as shown above above.


    Cutting the key Slots
    I cut the slots for the linings with the same lathe settings as for the key pad. This will ensure that the key is exactly in line with the seat and the hole. The slot is cut by moving the chanter towards the tool using the saddle applying a cut of about 0.5mm deep at each pass. The chanter is moved axially using the cross slide to cut the slot. This continues until the slot is about 0.3mm below the smaller diameter.
    I use a Ø2.5mm slot drill to cut the slots for a single key slot and a Ø5.0mm slot drill to cut the slots for the double keys.
    Care must be taken when milling the slots not to hurry the cut or the edges will be chipped.

    Keyslot linings.
    Materials. The key slots in the chanter should be lined with either brass or nickel-silver to ensure a long lasting, accurate fit with the key. My preference is to use 0.25mm ( 0.010") thick shim stock. This, when used in a 2.5mm wide slot, machined in the wood, gives a 2mm wide finished slot width. If thicker material is used the slot machined in the chanter will need to be adjusted to ensure that the finished key slot is exactly 2mm wide.

    lining dimensions
    Making the Key slot Liner for a single Key
    The brass shim is cut into strips of the same width as the length of the longest slot then annealed by heating to cherry-red and allowing to cool naturally. Take care not to over heat or the brass will melt. Cut into lengths of about 16mm. These strips should now be flattened by laying it on a flat surface, placing a piece of wood on top and tapping firmly with a hammer.
    The square of shim is placed centrally on the edge of the 2mm x 12mm strip and folded into a "U" around it. Squeeze the "U" with the fingers until it is as tight to the strip as possible.
    The 2mm x 12mm strip with the brass wrapped round it is pressed into the 2.5mm slot in the forming block. Place the assembly into a vice and the strip is pressed into the slot until the brass is fully formed round it. Remove the strip and extract the lining from the block. If all is well the shim should have been formed into an accurate channel with good square corners ready to fit the chanter (see the sketch above).

    Making the Key slot Liner for a Double Key

    To produce the double lined slots used on chanters with more than 7 keys, I use a slightly thicker brass shim 0.33mm (0.013") thick. This is prepared in the same way as the 0.25mm thick single linings except that it is cut to 20mm lengths, also an extra piece of the same material is cut 6mm wide and slightly longer than the chanter slot length. This piece is held in place using a twist of wire and silver-soldered along the centre of the 20mm length to create a 'T' shape (see illustration). It is important that only a very fine fillet of solder is left along the join and if any blobs or over-generous fillets are left thay should be filled away at this stage. Don't be tempted to use SOFT solder as this will not work!
    The bending to produce a double channel is similar to the single channel except that two strips of 2mm x 12mm steel are used instead of one, these are placed one each side of the centre strip and formed using a vice as for the single key linings.

    Fitting the linings


    The lining has accurately fitting strips of wood pushed into the slots. This is to support the lining as it is glued into the slot in the chanter.

    The lining should be an easy slide fit into the slot and is glued in place using Araldite (the 24 hour version).

    Once the glue has fully hardened the lining and the wood infill can be filed to fit the shape of the chanter. The Ø1mm key pivot holes should be drilled at this stage (see text). Don't remove the wood yet.
    When making the wood infill pieces it is important that they are made to an accurate width of 2mm to ensure that the keys are a good fit later in the process. The lining, together with the wood infill, should be an easy fit into the slot in the chanter so as to leave a minimal gap for the glue. The glue I use is the 24 hour version of Araldite. Don't be tempted to use the faster versions as they do not give a sufficiently good joint. I coat all of the joint faces with a thin coat of glue and press the lining firmly into the slot. Glue should ooze from all parts of the joint. This excess glue should be wiped away before it hardens to save effort later. Once the glue has hardened (I leave it overnight in the airing cupboard) the wood and metal can be filed to fit well with the shaping of the chanter. Work gently and take care not to peel the thin brass from the glue. This is what the wood infill is kept in place to protect against.

    Drilling the key pivot holes
    I drill the Ø1mm pivot holes for the keys at this stage whilst the chanter still has flat surfaces to make the drilling easy. Make sure that the drilled hole is not too close to the bottom of the lining slot (hard to see whilst the infill is in place but you should be able to measure it from the top of the slot and judge the correct distance down). I aim to have no less than 1mm from the bottom of the lining slot to the bottom of the pivot pin. Do use a sharp drill for this and don't apply too much pressure or the glued joint may be compromised.
    Finishing the chanter

    The final stage of making the chanter is to file the milled flats to the gentle curve shown on the drawings. Care must be taken to avoid scratching or gouging the nice turned parts of the wood. I use a medium 6" flat file to take off the meat of the excess wood. If you are unsure of your skill you can wrap a layer of masking tape over the areas that shouldn't be touched by the file. When the shaping is nearly to the final shape I switch to a finer file and then to 400 grit wet and dry paper glued to a flat piece of wood. I finally finish up with 800 grit which,once worn, gives a nearly perfect polish.
    Key Slots Filled with Wood


    Files used for Shaping

    polishing Sticks


    Go back to the blank preparation page
    Back to Introduction page index
    Back to Index page

    © Mike Nelson. All rights reserved.

    This manual has been put together by Mike Nelson for his own amusement :)

    Go back to Mike Nelsons Home Page

    This site is created and maintained by Mike Nelson for his own pleasure

    © 1997 Mike Nelson