The best pipe bag leather is called a "bag Pipe Side" available from Waltham Tannery Ask for James Boston. This leather is amazingly airtight and should require no seasoning. This is the leather that was used by Jackie Boyce who supplied bags to many of the worlds pipemakers. Jackie retired at the end of 2015 and, although he passed his business on, the current (2023) owner is not offering any pipebags for sale.
For my first couple of sets of pipes in 1980 I made my own bags using organic tanned calf skin with a thickness of about 1.5mm. This came from a Cornish tannery called Croggin's and required no seasoning to make it airtight. From 1711 the Croggan tannery flourished in Grampound and produced high quality leather by the traditional oak-bark method until it closed in September 2011.
Also usable is 2mm panel hide. This tends to be stiffer and more porous but, with careful selection and a good sealant, will be usable. A good friend Brian Foster who's main business was the production of gun holsters for professinal use, made a number of successful bags from panel hide.
If in doubt about the porosity of the leather hold a piece to your mouth and suck air through it. It will allow some air through but should need a good "suck" to do so.
Chemical (chrome) tanned leather is more readily available and in general is cheaper. (To check if the leather is "chrome tanned" look at the edge, if it has a central strata of a greyish white colour it is likely to be). These leathers can be used despite the historical recommendations to the contrary.
Some years ago the Northumbrian Piping Society hosted a demonstration of pipe bag making by Jackie Boyce, maker of the best bags I have used. The demonstration was videoed by Francis Wood at the time and I have been looking for a copy for many years. I do believe that it is a real shame the NPS didn't make a good video of the demonstration and make it available online as it would have been a valuable resource. Fortunately Francis Wood took the trouble to video the event and it is that video I have included here, assembled from 16 separate short clips to make up a 34 minute film that covers most of the techniques. Jackie Boyce pipebag making demonstration
I am currently (2023) making some bags using the information I have learnt from the Jackie Boyce video using the Waltham Tannery Leather. I have added a page with the still pictures from the Jackie Boyce demonstration and I will update this page with anything I learn. Details and notes from the Jackie Boyce pipebag making demonstration
Design considerations
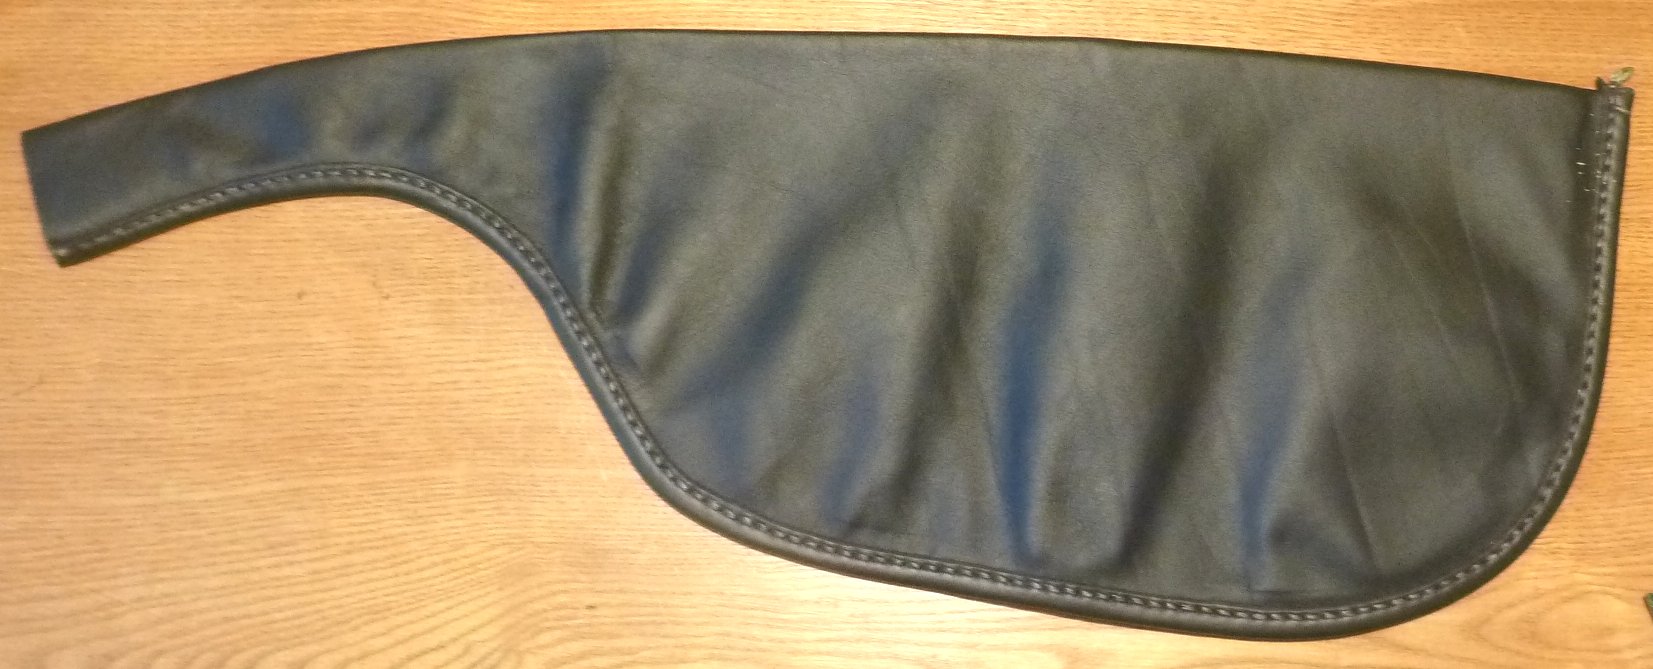
The shape of the bag is a matter of personal preference but the bags I use are similar to this shape shown here. This is very close to the shape used by David Burghley and feels very comfortable under the arm. From a design point of view it is important that the drone stock is positioned not lower than one stock diameter down from the top of the bag and far enough forward to place the chanter in a comfortable position. The blowpipe stock should be as low as possible (leaving room for the tieing in) and I place it vertically below the drone stock.
I make a full size flat template from 10mm cheap ply (I used to call it shuttering ply) The half templete is now only used to assist in making and marking.
Lay out the leather on the floor with the inside uppermost, inspect very carefully for damage or thin areas (mark any found with chalk or biro), lay the ply template on the leather moving it around until the full shape avoids all imperfections. hold the ply template firmly in position (Jackie kneels on it) and cut round using a very sharp knife. The shape should be again checked for any faults ( if any are found a piece of leather can be glued on the inside). fold the leather in half to check that all is well and mark a matching position on both edges . these will be used to ensure that when the latex glue is in place the bag can be glued easily without error as the glued surface is permanent once joined
The bag can now be glued. A thin layer of latex glue about 6mm wide is spread around the inside face of the edge of the bag. This is often done using an old knife, as a brush is very hard to clean. The leather is folded making sure that the previously marked positions match up exactly. Once the glued edges are joined the joint can be firmed up by some firm hammering around the glued area.
Adding the Welt
The welt is made from a strip of the bag leather 40mm wide and long enough to go around the edge with about 1" extra. From my experience of making one bag using the methods from the Jackie Boyce Video I would recomend that the thickness of the welt leather is about 1.5mm. My first bag used the leather from the Waltham Tannery bagpipe side which was 2mm thick. I have bought a Leather splitting machine and future welts will be 1.4/1.5mm thick. The strip is folded in half and the fold hammered to make the fitting easier. The center of the strip is coated with a strip of the the latex adhesive about 12mm to 15mm wide. The edge of the bag and a 6mm wide band on each side of the bag is coated with latex adhesive. The welt is glued initially to the edge of the bag making sure that the edge is centred on the 40mm width of the welt. Once fitted all round the welt is folded around the the faces of the bag making sure that the welt is tightly folded. The joint is hammered to make sure that the glue is fully consolidated.
Preparing the Thread
The leather is sewn with a strong well waxed hemp thread using a "saddle stitch" through holes punched using a "awl". The holes are spaced approximately 7mm apart and about 9mm in from the edge and go through all four thicknesses of the leather. The thread I use I make from 8 strands of Coats Barbour Linen Single Shoe. The process of making the 8 strand sewing thread starts with producing the 8 strands I Make the strands 10ft long ( about 3 meters). each strand is separated from the reel by laying the thread across the top of the leg with the reel on the left and the twist is unraveled by stroking with the palm of the hand towards the knee this enables the thread to be separated with a gentle pull and the end of the thread have a taper about 3" long. this process is repeated until 8 threads approximately 10 foot long are gathered together. The ends of the threads are staggered by about 4 inches (100mm) to give a taper of about 10"(250mm).
The 8 strands are gathered together and well waxed. I was shown this by a local saddler who had a strong nail in his bench and the threads were folded around this nail and the wax applied by firmly stroking the whole length of the threads until the threads were well covered with the wax. The wax I use I make using a mixture of bee's wax and Colophony resin (fiddle bow rosin) I use a ratio of about 2.5(resin) to 1(wax). Jackie uses Cobbler's Wax which is a similar material but I believe that it had the addition of pitch which makes it black.
Here is a link to an online recipe making-cobblers-wax
The 8 strands are rolled into a single thread by rolling on the thigh in the same way as the method used to separate the individual strands. The hank of 8 thoroughly waxed threads are held in the left hand and lie across the thigh. The right hand is stroked across the threads in the direction of the knee thus rolling the threads into a single unit. You may have to do this several times until the thread is fully rolled and looks right!
Sewing the leather
Start at the end furthest from the neck, pass one end of the thread through the first hole and pull through until the centre of the thread is at the joint. take the other end of the thread and pass it through the same hole from the other side. Pull the thread tight so that there is the same amount of thread out of each hole. Pass the first end of the thread through the second hole from the same side as it emerges and the second end through the second hole from its side. The threads are again pulled tight. This is repeated all the way round the edge finishing by tying the ends over the neck end. The thread will follow a figure of eight path with each end crossing over in a hole.
When the sewing is complete the overlapping strip can be cut back, leaving about 3mm outside the line of stitching. Jackies method of using a sharp knife with a rounded end didn't work for me so I used end nippers (Tom Swinney showed his end nippers during this part of the video). Jackie calls this Dressing the bag and it shouldn't be confused with seasoning(sealing) the bag.
On my second bag I used Jackies method for dressing the bag and managed it successfully - I just need to practice more!
Tieing in the stocks
The stocks are held in position in the bag by binding the leather to the stock with strong cord. My favourite cord is STUR-D-LACE braided dacron lacing tape with a breaking strain of around 50lb . This normally used to lace electrical cable forms in aircraft and other industrial applications (used by NASA for tying cable forms in the shuttle). You may be able to obtain it or a similar material from an electrical firm. If not you should use the thinnest cord that cannot be broken with a sharp pull. You will be pulling the binding very tight and it is very frustrating if the cord breaks and the wrapping has to be restarted from scratch. The cord must be well waxed by pulling over a block of bee's wax to help it grip firmly.
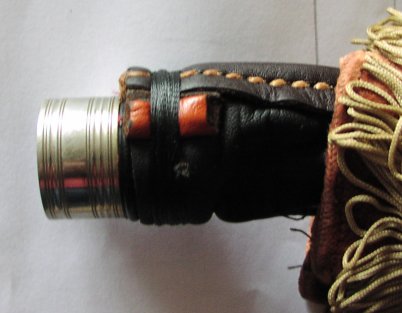
Start with the blowpipe stock, put it inside the bag and out through the drone stock hole and bringing it out until the groove in the stock is just inside the leather. Take a length of the cord and anchor one end and wrap one turn round the leather just above the groove and pull tight continue wrapping round the leather pulling the cord as tight as possible until the leather is firmly held ( usually about 10-15 turns ) and tie the ends of the cord together firmly.
The drone stock is pushed through its own hole small end first until it is entirely inside the bag, turn it round and bring it out through it hole until the groove in the stock is just inside the leather as for the blowpipe stock. Before binding to the bag, the stock should be rotated until the smallest drones are facing the neck end of the bag and the largest drones are at the back. Bind to the bag in the same way as the bellows stock.
The chanter stock requires a different method of tieing in to cope with the seam of the bag. A piece of leather (bag offcut) 20mm long by 10mm wide is rolled into a tube about 4mm diameter and a few turns of thin thread wrapped round to hold it to shape. The stock is pushed into the neck of the bag until it is about 20mm (3/4") in. Hold the neck in the left hand with the stock pointing to the right and the bag seam pointing towards you, fold the seam upwards round the stock. This will fit the leather of the neck closely to the stock except for a small gap under where the seam is folded, take the piece of rolled leather and place it over the gap holding in place with the thumb of the left hand. Take the cord in the right hand ( the cord is anchored at one end as before ) and bring it under the stock and wrap it round the leather pulling as tight as possible. The rolled piece of leather will be pulled against the gap closing it. Continue wrapping round until the stock is firmly held and tie the ends of the cord as before.
The bag should now be checked for leaks. Plug the drone and blowpipe stocks with corks, blow up the bag through the chanter stock, put a cork in this stock and hold the bag close to the face whilst pressing the sides of the bag firmly. A general, very gentle loss of air through the leather is acceptable but if any leaks are found in the stock/bag joints they should be rebound as is is easier to do this now than after the bag has been filled with sealant.
Sealing the leather
If the leather used for the bag is not naturally perfectly airtight it will be necessary to use a sealant inside the bag to make it airtight. The sealant used to seal the Northumbrian small pipes is different from most other bag pipes because the air used is pumped from bellows rather than mouth blown. This means that the sealant does not have to absorb moisture nor protect the bag from rotting caused by water. None of the proprietary bag sealants can be recommended, indeed they should be completely rejected as more likely to cause problems than cure them!
The mixture I use to seal the leather is one that was recommended to me by Colin Ross and is as follows:-
25gm (1oz) of beeswax
25gm (1oz) of colophony resin (fiddle bow rosin)
25gm (1oz) of white petroleum jelly (Vaseline)
250ml (1/2 pint) neetsfoot oil
Method
Melt the beeswax, the rosin and the Vaseline together in an old saucepan taking extreme care as all of these materials are inflammable. When they are well melted and mixed together pour in the neetsfoot oil and continue heating and stirring until all of the constituents are blended together and at a temperature hot enough to flow well but not scalding hot ( about comfortable drinking temperature! ).
Remove the cork from the chanter stock and pour about half the mixture ( about a cupful ) into the bag whilst holding the drone stock up to avoid allowing any of the sealant into it, recork the chanter stock and swill the mixture all around the inside of the bag. You will need to be fairly quick as the mixture cools quite quickly. Rub the sides of the bag together firmly to work the mixture into all the nooks and crannies ensuring that no area is left uncoated. Remove the chanter cork and blow some air into the bag, replace the cork and press the sides of the bag firmly to force the sealant into all of the pores. At this stage it will become apparent whether the sewing, tying and sealing have been successful. If any problems are found they must be tackled at this stage to avoid problems later. A general slight leak is often caused by insufficient sealant reaching some areas of the bag and can be cured by adding a little more and rubbing in well. Do take care however not to have excess sealant in the bag as lumps can break free and get on the reeds causing damage. Pouring in sealant will not cure poor stitching nor slack or inadequate binding of the stocks.
Further notes on the bag
If the leather is of very fine quality it may need no sealant added to seal. I have found that good calf with a smooth inside surface can often be completely air tight and if the stitching and binding is well done the bag will need no oiling at all.
Some makers (David Burghley) use neetsfoot oil on it's own to seal the bag, pouring an excess of oil in to the bag and, after working it well into the leather, hanging the bag up and allowing the excess to drain out of the neck.
I have also seen successful bags made from rubberized canvas glued together, requiring no sealing at all.
After a bag is sealed I put it in a cover made from toweling to absorb any excess oil which may soak through the leather, so that when the set is complete it can be assembled into its final cover without the risk of oil stains.
Take care to remove any sealant which may have got into the stocks. This can be done with a piece of cloth wrapped round a stick.
Everything from here to the end of the page is awaiting updates May 2023
drawings to be added (and more information) as soon as I have time