Mandolin Plate tuning using Chladni patterns
Equipment used

1) A sine wave generator that allows the frequency to be changed smoothly.
2) An amplifier to boost the signal from the sinewave generator 3) A loudspeaker mounted under a flat surface.
4) Some small, soft foam blocks to support the plate.
5) A couple of tubes of Christmas Glitter. (this is in the form of tiny, shiny, flat plates and is used as a decoration on Christmas cards and the like by sprinkling it onto a glue shape on a blank card). Sand, salt or sugar will also work but not so well.
I have a 6" loudspeaker mounted under my workbench as shown. It is quite a fragile item so a cover for it should be made for when it is not being used. The 4 foam blocks are used to mount the plate over the speaker and should be set to the minimum height that doesn't allow the plate to touch the benchtop (even when vibrating) I try to set this to about 3/32" max.
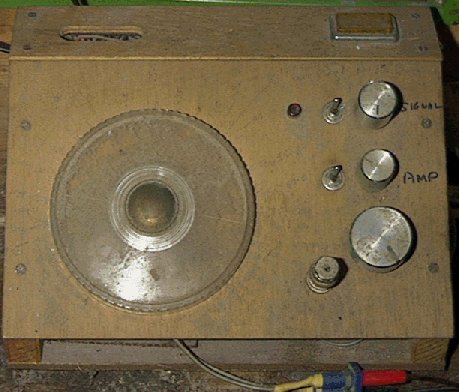
The Sine wave generator and the amplifier are contained in the rather crude package shown here and work well despite the appearence. The big dial (from an old radio) sweeps the frequency of sine wave. The top dial (marked "signal")sets the amplitude of the signal and can be left set. The dial marked "amp" controls the volume at the loudspeaker and should be set to give a good level of vibration to the plate.
In order to measure the actual frequency I use my Boss electronic tuner (the same one I use when tuning up to play) This is sufficiently accurate for this purpose and is a cheap way of getting the required accuracy. I have also used a "Quiktune" tuner that cost only $20 and I find it usless for tuning the instrument but quite OK fo reading the frequency of the sine wave - probably because the sine wave doesn't have the complex wave form that a string produces.
The knob at the bottom sets the frequency to either high, medium or low range.
Tuning the plates - some examples
The pictures below show the final state of tune of the front plate of the A5L copy that I am making. I didn't take any pictures of the patterns during the thicknessing of the plate but most of the effort is done at the early stage, before the bars are fitted or the sound holes cut. The Chladni patterns are much more coherent then.
One thing that does have a significant influence on the quality of the patterns and the activity of the plate is "lumps" by this I mean sudden local changes in thickness. These will show up as an imbalance in the shape of the Chladni pattern. Uneven arching will produce the same effect.
I hope to have the camera available when I thickness the back of this instrument and, if all goes well, I will update this page to show the way the thicknessing effects the Chladni patterns.
With the plate mounted on the foam blocks over the loudspeaker, I sprinkle the surface with a light dusting of the "Christmas Glitter" before starting the sinewave generator.
sweep the frequency until the glitter on the surface starts to dance. I should then be possible to fine tune the frequency until the maximum activity is observed and the line of no movement becomes well defined.
The glitter will then migrate to the parts of the plate that are moving the least and away from the parts that are moving the most.
There are a number of different modes that the plate will vibrate in each corrosponding to a different frequency. Only a few of them can be found easily using this powder migration method and only 2 of these are strong enough to give the clear patterns I have shown here.
If you hold the plate between thumb and fingertip, exactly on one of the node lines, close to your ear and tap the plate at one of the areas where the glitter has moved away from you should hear the plate ring at that frequency. You can see how the place where that plate is held and the place where it is tapped will significantly influence the amount of ring that the ear will hear.
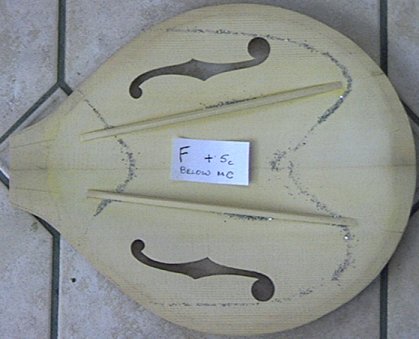
The picture at the left shows the lowest strong frequency. In the case of this instrument is 5 cents above the F below middle C.
NOTE 1 cent is equal to 1/100th of a semitone. I will add the actual frequency as soon as I have worked it out.
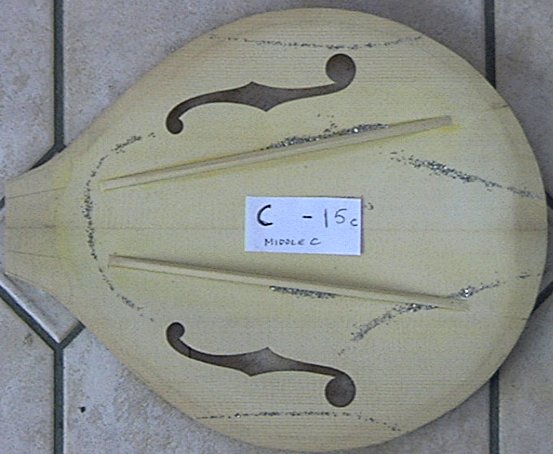
The picture at the right shows the pattern at 15 cents below middle C. Of course I have no evidence so show if these frequencies are good or bad. Only time and experience can show that.
Ray: Yeah, that's right. I normally tune the top to a C-note and the back to a D. I had a couple of mandolins where the spruce I used for the tops was pretty hard. I had carved the top down to a C#, but I didn't want to go any thinner because of the structural aspect. So I decided to leave it at C# and make the back tune to a D#, to maintain the same relationship. These mandolins ended up sounding great. I think the relationship of the frequencies, how they all work together, are more important than tap-tuning to a particular note.
I have read that one maker of considerable repute (Ray Dearstone) tunes the front and back a tone apart with the back the higher.
The following is a quote from an interview located on his web site. Follow the link for more information.